Coffee Roasting - S Curve
Roasting Basics
A while ago I was on a holiday visiting a friend interstate, he worked at a roastery café and invited me to come a have a look. I found the coffee to be really bitter and smoky and was not excited about it by any means. After about 20 minutes the Roaster/Owner came by, we were introduced and he sat down for a chat. As we were talking shop I told him about the new roaster I had purchased and that I had computer software that can automate part of the process, plot graphs, record information and give me a more accurate reading of what I was doing. He began to explain to me that he doesn’t believe that you need software because the process isn’t that complicated. He then began to tell me about his hobby of brewing beer, “Beer brewing has four different processes, coffee only one, it’s not that hard really”. I couldn’t help but completely disagree with him, though I fully understood why the coffee experience I had there was below average. Now this man had quite a successful business but this article is about chasing that perfection not running a business.
We need approach coffee with a healthy respect of its complexity. We can’t feel that we have finished learning about it or that we already know it all because the person who already knows it all cannot be taught anything. Don’t miss out on the opportunity to learn more of your craft.
I started roasting coffee a little over 5 years ago and think that I have a substantial amount more to learn, but thought I could share a little about what I have discovered so far. Keep in mind that this is a very basic way to roast coffee. A large portion of the coffee I roast is based off this profile, though with more steps, which I won’t go into, to keep it as simple as possible for now. Even when applying this model to a few different coffees, the way that you will have to control heat is quite different.
Coffee roasting is quite complex because of all you must learn, as well as trial and error required, but the basics can be taught. I can’t give you the knowledge to be a coffee roaster in this blog post, but hope to give the aspiring roaster a little help starting or to give the café managers, baristas and consumers that healthy respect for the complexity of the drink we all have every day.
This profile is written for use with a gas operated classic drum style roaster, I am unsure if it will be applicable to another style of roaster (fluid bed, indirect heat, re-circulation etc) as I have not tested it in other roasters. I would assume that it could be applied in a similar fashion but more experimentation would be required.
S Curve Roasting
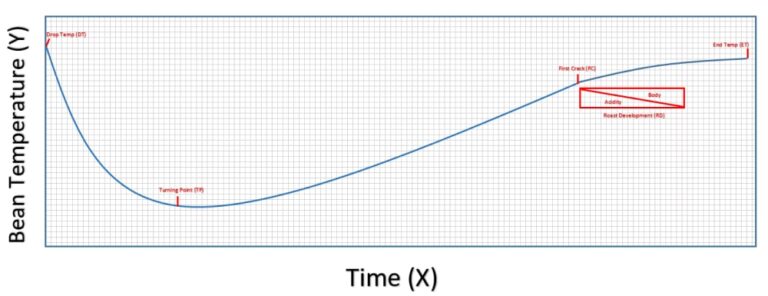
This diagram is a representation of a basic S curve type roast profile and will begin to make sense as you continue reading. As you can see the Temperate is on the Y axis and time on the X axis. I haven’t placed any temperatures because they will be different between roasters, it depends on the probe location. This model is essentially a very basic version of the profile that I use, it is relatively easy to understand and will allow you to get good development of your coffee. I believe that you could apply this to most good coffee as a medium roast and get something nice. Furthermore, this will allow you to have a point of reference so that you can test your roast and make adjustments to your profile. Over time you are able to simplify the process by using a profile from a similar coffee in the past and then making minor adjustments as you go.
Before you start your roast you will want to know at what temperature the roaster and coffee usually hits First and Second Crack. This will give you an approximate window that you can work between to give a medium style roast. Personally, for espresso I would not remove the coffee until around 1-2 minutes post First Crack and would ensure to remove the coffee at least 1⁰celisus before Second Crack. This will actually be a large window but should allow for a well-developed coffee without the oily/roasted tastes that usually occur post second crack and the sour underdevelopment that occurs before First Crack.
Key Points
During a roast there are a few events that occur that will require action, usually in the form of adjusting the burners.
Drop Temp (DT)
This is the temperature you bring your roaster up to before loading your beans and beginning the roast. As a guide you could use the second crack temperature as your Drop Temperature and then depending on how your roast progresses, make changes from there.
During this period you can apply the burners in a variety of different ways. Some people use a “soaking” method. Meaning they will have a relatively low heat to begin with and allow the coffee to turn slowly. One of my roasting rules is that when the coffee has been just put into the roasters it is the toughest it will be. So I will aim to get as much heat into the bean early rather than later as later can cause some issues.
Turning Point (TP)
Immediately after loading the beans the temperature will begin to plummet as the cold coffee absorbs heat. Shortly after loading you will reach the TP, this is when the coffee has absorbed enough heat that it stops reducing the temperature and starts rising. If your entire roast runs too long one way to decrease the time spent roasting is to engage the burners before you reach TP or apply more initial heat to assist the turn. From this point, depending on roaster type, I would engage burners high, if they aren’t already, to allow the heat to penetrate into the inner bean. Then as your roast progresses try and reduce the burners to allow for a Rate of Rise of around 10⁰C per minute.
First Crack (FC)
Throughout the roast the coffee bean is losing moisture, sugars are caramelising, and a multitude of other reactions are taking place. When the bean reaches a certain temperature moisture and gas is released along the seam of the bean and result in a popping or cracking sound. At this point the burners need to be reduced to ‘very low’ or ‘completely off’ depending on the roaster. The bean is going through very rapid loss in moisture and weight, if the burners aren’t reduced the ends of the bean can start to blacken, called tipping, and the surface of the bean can start to scorch. If you don’t reduce burners it can accelerate your post FC period and you will end up with a way too dark roast. Another factor to consider is to wait until there is a crescendo of cracks, 3 to 4, to mark the beginning of the ‘first crack’ stage – sometimes there is a crack before the others.
Before FC is the time you can use to prepare your next roast and possibly pack the previous but as soon as it starts you must stay in front of the machine as the likelihood of fire from here on increases dramatically and a small time lapse can ruin the roast.
Roast Development (RD)
The flavour of your coffee will be developed throughout the entire roast but within this small window you can have a large effect on the overall taste on the coffee. Scott Rao has a great rule that the period from First Crack until the end of the Roast should be between 20-25% of the entire roast. I do agree with this however, I currently roast our milk blend at 19% and lighter as long as I can achieve full development.
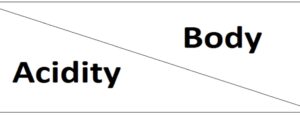
The longer you spend in Roast Development the more body the coffee will have at a sacrifice to acidity. This is not always the case but from my experience it is generally true. Acidity can be associated with fruit so if you want to bring out those fruity notes I would roast to allow for higher acidity or alternatively, for a “chocolaty” flavour I would roast a little longer. There are other things that I would implement to my roast profile in other stages of the roast to bring out those flavours but to go into those details is outside the scope of this article. It is important during RD (or the entire roast) that you don’t let the temperature of the roaster drop and aim for the temperature to rise by no more than 6 deg. It may be necessary to apply a very small amount of heat towards the end of RD to ensure that the temp doesn’t drop but if you plan your roast correctly you shouldn’t have to do this.
End Temp (ET)
Before you have started roasting you should have in mind what degree of roast you are aiming to achieve. This profile would be suited to a medium style roast. Most roasters will have a viewing window or a portal to scoop out a small amount of coffee to check on how the roast is going. As the roast keeps progressing after the RD period check your coffee and watch as the bean surface starts to expand and smooth out. My advice would be to start out a little darker, just before 2nd crack, until you are more confident and have a better understanding of the process then roast lighter as you learn to develop your coffee.

Conclusion
You don’t want you coffee like your steak, crack open a roasted bean under your thumb and look for a uniform colour from the inside to the outside, no medium rare coffee beans!
This information is intended to be used as a starting point and then used as a base to be expanded upon. It is important to experiment with your temperature and heat profiles. I would recommend that you read some coffee resources as you continue to roast and expand you skills. I also recommend reading Scott Rao’s Coffee Roaster Companion. I also think that it is important that you don’t just copy other roasters, but add their information to your current way of doing things, be unique and most of all happy roasting.
